Sunday, December 4, 2011

How To Get Backlinks Easily Free - Ways To Get Backlinks

You know if you have a new blog or website you have to struggle for visitors and getting ranked in search engine. But the only one way to get up in search engine is getting backlinks. But the thing is getting the right and quality one way backlinks from high pagerank sites is not an easy task.Now I'm providing you Top 5 ways to getting your backlinks for free.

Way 1:  Content is king. Try to write as much quality content as you can that will encourage the readers to link to your site. The more useful, informative content you post, the more likely people are to link it. But mind it, this method can take a while to really pay off because like all the new websites, you don't get much traffic.

 
Way 2:  Write quality articles and submit them to top article directories like ezinearticles and goarticles etc. The advantage in this is, you'll not only get a backlink from high pagerank directories, but also you'll find that your articles are used on other people's sites with a backlink to your site.
Way 3:  Participate in forums, discussion boards that are related to your website's niche and add a link to your site in the signature. Make sure that you write quality posts, don't spam. This will also help you get some decent traffic to your site.

Way 4:  There is absolutely nothing wrong to get a backlink from a related blog post you decide to comment on. This is one of the effective way of one way link building especially if you comment often on blogs. Comment on blogs related to your niche with a link back to your site as your signature.. and Again, make sure you never spam.

Way 5:  Submit your site link to major, well known web directories. Getting listed in directories related to your site not only bring you tons of targetted traffic, but will also improve your search engine rankings. Some of the popular directories to get listed in are DMOZ directory and Yahoo directory. You can submit your link to both paid and free directories and they worth your time.

I hope this article will help you to get your backlinks. Just try to follow on and get success. If you have any question or any problem you can ask me via comment here.

How To Add Clickable Image in Blogger

I'm sharing this post to shows you how to add pictures, clickable images, images which opens in a new window),etc.Let's see how to do it.
Now it is for adding a picture which is (unclickable one):
First upload your photo to any free image hosting site like photobucket.com. You can upload your photo in any site. They will provide an url (link) directly to the photo.Take a note of the url and use the code below replacing the url( from http to jpg) in the code to your original one.(Set your own dimensions to suite your needs)


<img src="http://i219.photobucket.com/albums/cc286/7kranthiswaroop/john1.jpg" alt="john cena" width="160" height="134" />
The image looks like this (unclick-able)
john cena

Now it is for adding a picture which is  click-able:
Here is the code to add a clickable image(open in the same window)
<a href="http://premiumadmin.blogspot.com/"><img src="http://i219.photobucket.com/albums/cc286/7kranthiswaroop/john1.jpg" alt="john cena" width="160" height="134" border="0" /></a>
In the above code, premiumadmin.blogspot.com is the target url (replace that url with your desired target url) and the image url aswell (set your own image dimensions).
The output image will looks like this

john cena

Now it is for adding a picture which is click-able and opens in new window:
Here is the code for it
<a href="http://premiumadmin.blogspot.com/" target="_blank"><img src="http://i219.photobucket.com/albums/cc286/7kranthiswaroop/john1.jpg" alt="john cena" width="160" height="134" border="0" /></a>
The output image looks like
john cena
(click on the images if you want to test)

If you want to add the pictures in sidebar,sign into your blogger account > add a page element > html/javascript > paste the code and save the changes.

If you have any question or any problem you can ask your questions via comments and get the answers.

How To Add Popular Post Widget on Blogger Blogs

How To Add Popular Post Widget on Blogger - Popular post Widget on blogger blogs is a nice arrangement of main or interesting posts which are mostly viewed by the visitors. It helps to know the visitors about the most wanted and popular posts so that they can save their time. Through some easy steps we can Add Popular Post Widget on Blogger Blogs.


Steps to follow:

Log in to Blogger > Go to Layout -> Add a Gadget -> HTML/JavaScript

Now copy and paste this code in to the widget:
Widget Style #1


<script type="text/javascript">
function pipeCallback(obj) {
document.write('<ul style="text-transform: capitalize;">');
var i;
for (i = 0; i < obj.count ; i++)
{
var href = "'" + obj.value.items[i].link + "'";
var item = "<li>" + "<a href=" + href + ">" + obj.value.items[i].title + "</a> </li>";
document.write(item);
}
document.write('</ul>');
}
</script>
<script src="http://pipes.yahoo.com/pipes/pipe.run?_render=json&_callback=pipeCallback&_id=28a6afad7c6ba1288c1b738277e42385&url=http%3A%2F%2FYOUR_BLOG_ADDRESS_HERE_WITHOUT_http://&num=10" type="text/javascript"></script>
<a href="http://bloggerstop.net" target="_blank"><span style="font-size: xx-small;">Popular Posts Widget</span></a>

NOTE: REPLACE everything in RED color in the code above with your blog's address without typing http://

The above code displays 10 posts, you can change it by editing the number being displayed in blue !

The above widget code, displays the links/titles like this:

Post one (18)
Post two (14) etc.

If you want to display them like this:

Post one (18 comments)
Post two (14 comments),

then use this code :


Widget Style #2

<script type="text/javascript">
function pipeCallback(obj) {
document.write('<ol style="text-transform: capitalize;">');
var i;
for (i = 0; i < obj.count ; i++)
{
var href = "'" + obj.value.items[i].link + "'";
var item = "<li>" + "<a href=" + href + ">" + obj.value.items[i].title + "</a> </li>";
document.write(item);
}
document.write('</ol>');
}
</script>
<script src="http://pipes.yahoo.com/pipes/pipe.run?_render=json&_callback=pipeCallback&_id=ML4p0UfW3RGgS7iN1JzWFw&url=http%3A%2F%2FYOUR_BLOG_ADDRESS_WITHOUT_http://&num=10" type="text/javascript"></script>
<span style="gt;Widget by <a href="http://www.bloggerstop.net">Blogger Widgets </a></span>
And in case, you want to display the popular posts without the number of comments, use this code:
Widget Style #3

<script type="text/javascript">
function pipeCallback(obj) {
document.write('<ol style="text-transform: capitalize;">');
var i;
for (i = 0; i < obj.count ; i++)
{
var href = "'" + obj.value.items[i].link + "'";
var item = "<li>" + "<a href=" + href + ">" + obj.value.items[i].title + "</a> </li>";
document.write(item);
}
document.write('</ol>');
}
</script>
<script src="http://pipes.yahoo.com/pipes/pipe.run?_render=json&_callback=pipeCallback&_id=097d1b822fc6f356d8376802a911036b&url=http%3A%2F%2FYOUR_BLOG_ADDRESS_WITHOUT_http://&num=10" type="text/javascript"></script>
<span style="gt;Widget by <a href="http://www.bloggerstop.net">Blogger Widgets </a></span>
P.S. : Please do not remove the footer link...

How to add favicon in blogger manually - Easy Tips

Adding Favicon in your blogger blog is so easy. First of all create a favicon and learn what is favicon. You know that favicon is a little icon that appears next to the web addresses, like the one you see above? When you visit the sites or bookmark them, these icons will make these URLs stand out. These are “Favicons” or “Favorite Icons”.

First of all make a icon with a software or you can use online favicon maker website to generator your icon free. Generate your favicon and then download in your PC on desktop. The only method to use will be to upload the icon into some web folder, and create a link. You can read about using free hosts like Google Page Creator and Google Groups. We have also a rather comprehensive list of free Image Hosts and File Hosting Services in our article on Manage Blogger Image Storage Space. Check out those sites and choose one that is fast, reliable and allows uploading of .ico files. But I always prefer Googele Picasaweb. So, if you are logged in you can visit this site: http://www.picasaweb.google.com/
Now, Here Upload your Favicon Icon. Click on the Icon and grab the url of the icon (To get Image URL right click and choose View Image. Now copy the url.)

Once you have done that, take note of the URL of your icon. If you are using Google Page Creator, hovering your mouse over the link, you will see that the file is stored under a directory which looks like this http://yourname.googlepages.com/iconname.ico
where “yourname” is your Gmail account name, and “iconname” is the file name. Copy this URL.

Go back to your Blogger dashboard and under the Template tab, go to “Edit HTML”. Near the top you will see a line like this:-


<title><data:blog.pageTitle/></title>

Update: Copy and insert the following code below the line:-


<link href='URL of your icon file' rel='shortcut icon' type='image/vnd.microsoft.icon'/>

Inserting this will also work but the former is preferred:-


<link href='URL of your icon file' rel='shortcut icon' type='image/x-icon'/>

Remember to type in the “URL of your icon file”.

Save the template. When you refresh your blog site, you should see your nice little Favicon next to the blog address.


Other image types: The .ico image format has been used by many but you can also create an image under the .png or .gif format. Ensure that the size of the image is either 16x16 pixels or 32x32 pixels.

If you have a PNG format image, the link to insert is:-


<link href='URL of your icon file' rel='shortcut icon' type='image/png'/>

If it is a GIF format image, the link is:-


<link href='URL of your icon file' rel='shortcut icon' type='image/gif'/>

External Domain:  For those who have hosted sites in external domains, insert the link in the root directory as well. Otherwise, you can upload the file into the root directory and name it favicon.ico

As an example, if your domain name is www.domain.com, the URL of the favicon will be www.domain.com/favicon.ico

This method is not preferred but a number of browser versions are able to process the icon. Since we do not have external domains to try out this alternative, you may want to see if it works for you.

Compatibility: While you can see the Favicon in Mozilla Firefox, many have problems seeing the Favicon in Internet Explorer. This is a known problem and has been a sore point with many IE users. In some versions of IE, bookmarking the site will display the Favicon. This is not necessarily so in IE7 that we are using. In fact, when we bookmarked the highly popular search engine sites, their Favicons don't show in our IE bookmarks too although they show well in Firefox. Perhaps this is one more reason to download Mozilla Firefox if you have not already done so.

© Tips and Tricks for Bloggers

How To Add Search Box Manually in Blogger

The Google Navigation bar at the top of your Blogger blogs has an embedded search box. However, you may want to include a similar box in the main body of your blog (like what I have done), or the sidebar. Other than the convenience for users, the added advantage is that unlike Google search box, the search results of this Blogger.com search box appear in the main body of your Blog.

Under Template->Page Elements tab, click “Add a Page Element” at the place where you want your search box to appear. Select “HTML/JavaScript”.

There are several HTML codes posted on the net. I tried a few, and found the one that works as follows:-

<p align="left">
<form id="searchthis" action="YOUR BLOG URL/search" style="display:inline;" method="get">
<strong>NAME OF YOUR BLOG<br/></strong>
<input id="b-query" maxlength="255" name="q" size="20" type="text"/>
<input id="b-searchbtn" value="Search" type="submit"/>
</form></p>

Remember to change YOUR BLOG URL to the URL or web address of your Blog. Also, change the NAME OF YOUR BLOG to that which you want to call your site. For instance, if your Blog Name is long, you may want to write something like “Search Here” or “Search this site”.

You can also change the “Search” button to say, “Hit” or “Go”, by changing the Value.

Save the code and refresh your page. If you want a longer or shorter search box, you can play around with the size. The above example of a width size="20" and value="Hit" will give you this:-


Search Here


Whereas a width size="30" and value="Go" will give you this:-

Search Here


The size of the search box is a matter of appearance. You may have noticed that the maxlength="255". This indicates that a user may enter up to 255 characters in the search box, which I think is sufficient and need not be altered.

Image instead of Search button

Search Tips for New Bloggers


Just for the fun of it, if you want readers to click an image instead of a button, you will first need to do up a small picture. You can also resize a picture you already have with photo editing tools like Google's Picasa. After creating a picture, upload it onto a free server like GooglePages or Google Groups, or other free hosts that offer direct links to the image files. Take note of this IMAGE URL.

The HTML code to insert is this:-

<p align="left">
<form id="searchthis" action="YOUR BLOG URL/search" style="display:inline;" method="get">
<strong>NAME OF YOUR BLOG<br/></strong>
<input id="b-query" maxlength="255" name="q" size="20" type="text"/>
<input id="b-searchbtn" type="image" src="IMAGE URL" align="top"/>
</form></p>

Remember to insert into the code the IMAGE URL, where your picture is uploaded. You can align the image to the top, bottom or set a horizontal space between the bar and the image by using a hspace tag. For more examples on alignment of images, you may refer to the article Hyperlinks and Image Links (II).

While it is alright to replace the button of your Blogger search box, you may not want to do that with the Google search box since their T.O.S. disallows any alteration of their code.

© Tips adn Tricks for Bloggers

Best social bookmarking sites for blogger

Social Bookmarking sites are special sites where anyone can create an account and upload their bookmarks to it. You can make these bookmarks accessible to others by making them public or keep them private. The links within these bookmarks are classified by tagging them with keywords which signify their overall nature. Thus you can tag all your friends blogs under blogs and all the technology links under technology. Some sites periodically verify that bookmarks still work. Notifying users when a URL no longer functions. Visitors to social bookmarking sites can search for resources by keyword, person, or popularity and see the public bookmarks, tags, and classification schemes that registered users have created and saved.


Social bookmarking dates back just a couple of years, when sites like Furl, Simpy, and del.icio.us began operating. Social bookmarking is particularly useful when collecting a set of resources that are to be shared with others. Anyone can participate in social bookmarking.


del.icio.us


The best known currently of all such tools is del.icio.us. There are some 70k users at the time of writing. This is very much a personal, out-of-hours effort by Joshua Schachter. Developed initially as a simple web page listing links with annotations, Schachter then decided to make these available on a web server so that friends and others could also make use of these bookmarks.
In all the codes given below change the character '&' to '&a m p;' typed without spaces.
To add the code for del.icio.us to your blog posts Login to Dashboard and go to Layouts. Then click on Edit Html subtab of Template tab and first backup your template to PC. Then put a check in Expand Widgets Template box at top of Edit Teplate text box and scroll down to the blog posts widget footer to this line :

<p class='post-footer-line post-footer-line-3'/>

Paste the following code below the above line :

<a expr:href='"http://del.icio.us/post?url=" + data:post.url + "&title=" + data:post.title'> <img alt='Del.icio.us' src='URL OF DELICIOUS GIF'/></a>

Save the image above to your PC and then upload it to a freehost like Googlepages and then paste its link instead of 'URL OF DELICIOUS GIF' in above code. Save Template.


Furl


Furl (for 'File URL'), first programmed in '03 by Mike Giles, had its official public launch in January '04. It has now attracted several hundred thousand users. A distinctive feature of Furl is that it saves web pages as well as links with each member being allocated some 5 GB of storage. Furl was created in response to the author's personal need for full text searching in order to find information he had previously read. Many Furl users have built up extensive libraries, and full text searching is seen by many as the most important way to recall this information. Tagging is considered a secondary activity. An interesting problem with hosting local copies of bookmarked pages is the potential for copyright infringement, if, for example, pages that require subscription access to view are being saved in their entirety on a third-party service. Furl has bypassed this problem by limiting access to the hosted copy to the original user who bookmarked it, and hence presumably has legitimate access to the content. Other users are simply directed to the original URL.

To add the Furl Bookmark to your posts add the following code at the same position as the del.icio.us code above. Also save the Furl image above and upload it to a freehost so as to add its link in the code below :

<a expr:href='"http://www.furl.net/storeIt.jsp?u=" + data:post.url + "&t=" + data:post.title'><img alt='Furl' src='URL OF FURL GIF'/></a>

Save Template.


Simpy


Simpy was authored by Otis Gospodnetić. Released in May '04, Simpy now has several thousands of active users, and several hundreds of thousands of links. The service was created for the sole purpose of organizing links: the social aspect grew out of that. Simpy allows users to track other users' bookmarks by creating 'topics'. Any number of users or specific searches can be saved to a topic, and these results will be checked for new bookmarks. These topics can then be made available as RSS feeds. The latest version of Simpy allows users to create lists of notes, which can be tagged in the same way as bookmarks.

To add the Simpy code download the Simpy image above and upload it to a freehost and put its link in the below code :
<a expr:href='"http://www.simpy.com/simpy/LinkAdd.do?href=" + data:post.url + "&title=" + data:post.title'><img alt='Simpy' src='URL OF SIMPY GIF'/></a>

Add this code in the same place as the Furl and Del.ici.ous codes. Save Template.


Spurl


Spurl.net (after 'SPecial URL') was authored by Hjalmar Gislason, and it is another example of an on-line bookmarking service and search engine. It currently has several thousands of active users.

Spurl.net, similarly to Furl, allows hosting of local copies of pages that have been bookmarked, the full text of which can then be searched. Spurl.net allows users to define their bookmarks as public (the default) or private, the latter being the most commonly selected setting. Spurl.net supports both multi-level categories, as well as user-assigned tags, and runs a special search engine Zniff that uses human information for ranking and indexing. To add the spurl code follow the same procedure as in the above cases. The code is given below :

<a expr:href='"http://www.spurl.net/spurl.php?url=" + data:post.url + "&title=" + data:post.title'><img alt='Spurl' src='URL OF SPURL GIF'/></a>

Save Template. If you have any problem you can ask me via comment on this blog.

How To Customize Blogger Slideshow Gadget

You know blogger blogs let you to use Blogger Slideshow. But Blogger slideshow gadget does not give the user many options like adjusting the size and style. Google AJAX Feed API provides the full code behind the slideshow gadget and also the opportunity to customize it as you like.


The Slideshow Gadget Code:
The gadget code loads the slideshow using AJAX Feed API and Javascript. Within the code a location on your page is defined to show the slideshow and style the dimensions. Lastly Javascript is used to create a slideshow control on your page. The full Slideshow code is shown below :


<script src="http://www.google.com/jsapi" type="text/javascript"></script>
<script src="http://www.google.com/uds/solutions/slideshow/gfslideshow.js"
type="text/javascript"></script>
<style type="text/css">
#picasaSlideshow {
width: 250px;
height: 200px;
margin-bottom: 5px;
padding: 5px;
}
</style>
<script type="text/javascript">
google.load("feeds", "1");
function OnLoad() {
var feed = "PUT FEED URL HERE";
var options = {
displayTime:2000,
transistionTime:600,
numResults : 8,
scaleImages:true,
fullControlPanel : true
};
var ss = new GFslideShow(feed, "picasaSlideshow", options);
}
google.setOnLoadCallback(OnLoad);
</script>
<div id="picasaSlideshow" class="gslideshow"><div class="feed-loading">Loading...</div></div>
<a href="http://www.blogdoctor.me/2009/02/custom-slideshow-gadget-for-blogger.html">Custom Slideshows.</a>

In the above code replace "PUT FEED URL HERE" with the link of the RSS feed of your pictures album at Flickr/Photobucket/Picasaweb as shown below.

Feeding The Slideshow:

The next step is to provide a stream of pictures to the slideshow. To provide this first create an account at Flickr.com or Photobucket.com or Picasaweb.google.com. Then upload all the photos you want to show to this account.

After uploading pictures you will get the RSS feed from the album created at Flickr :

http://api.flickr.com/services/feeds/photos_public.gne
?id=USERID&lang=en-us&format=rss_200

Replace USERID with your actual userid at Flickr.com.
RSS Feed from Photobucket.com :

http://feed266.photobucket.com/albums/ii244/USERNAME/feed.rss

Replace 'USERNAME' with your actual username.
RSS Feed from Picasaweb :
http://picasaweb.google.fr/data/feed/base/user/NAME/
albumid/NUMBER
?kind=photo&alt=rss&authkey=KEY&hl=en

Replace NUMBER, KEY and NAME with actual values.

Then copy the full feed url and paste in the code given for the slideshow gadget instead of "PUT FEED URL HERE".

Customizing Slideshow


To customize the slideshow modify the gadget code as shown below :

To Change Number of Images modify this line in gadget code and change the number to what you want :numResults : 8,

To resize images add this line immediately below the numResults line :scaleImages : true,

The images will be resized according to original aspect unless you add this line also : maintainAspectRatio : false,

To change how long images are displayed modify the number in :displayTime : 2000,

To link the images to their source add this line : linkTarget : google.feeds.LINK_TARGET_BLANK,

To show images in medium thumbnail size use this line :thumbnailSize : GFslideShow.THUMBNAILS_MEDIUM,

For small size thumbnail images : thumbnailSize : GFslideShow.THUMBNAILS_SMALL,

Lastly to increase width and height change this code :

#picasaSlideshow {
width: 250px;
height: 200px;
.....
}

Decrease width number to fit in your sidebar width. You can get the width of the sidebar from your blog template code :

#sidebar-wrapper {
width: 220px;
...
}

Installing Slideshow


After modifyng and customizing the slideshow code as shown above :

Login at Blogger.com> Click Layouts link on Dashboard.
Click Add Gadget link on Layouts---> Page Elements subtab.
In Popup window scroll down and click on HTML gadget.
Paste the modified code in Contents window.
Save gadget. If you face any problem then you can ask me via comment.

How to add Google Map in blogger blog with markers

How to add Google Map with Markers in Blogger Blog? I'm just going to showing you this tutorial. Only maps are not ok for most of the viewers. Because they are now comfortable with markers. Markers are used on a map to identify points on the map. See picture below with markers.


Google Map with Markers in Blog - Add Google map in Blogger
OK. Now set your Google blogger blog with Google Markup map. Follow the steps now.
 

STEP 1. Get a Google API key for your blog.
In the first step you have to generate a Google API key for your blog here. Put a check in "I have read and agree with the terms and conditions (printable version)" box by clicking it. Paste your blogspot URL in the text box and click Generate API Key button. Copy down the key generated.

STEP 2. Modify the Template Code.
Login at Blogger.com > Layout link under Blog Title on Dashboard.
Click Edit HTML subtab of Layout tab. Scroll down in Template Code box and change :
 

<body>
TO :
<body onload='initialize()' onunload='GUnload()'>

Now Save your Template.

STEP 3. ADD HTML GADGET in sidebar.
Login at Blogger.com > Click Layout link on Dashboard under blog title.
Click Add Gadget link on Page Elements subtab of Layout tab.
In popup window scroll down and click HTML/Javascript Gadget.
Copy the code below and paste it in Contents window of the HTML gadget :

<script src="http://maps.google.com/maps?file=api&v=2&key=PASTE_YOUR_GOOGLE_API_KEY_HERE

type="text/javascript"></script>
<script type="text/javascript">
function initialize() {
if (GBrowserIsCompatible()) {
var map = new GMap2(document.getElementById("map_canvas"));
map.setCenter(new GLatLng(37.4419, -122.1419), 13);

// Add 10 markers to the map at random locations
var bounds = map.getBounds();
var southWest = bounds.getSouthWest();
var northEast = bounds.getNorthEast();
var lngSpan = northEast.lng() - southWest.lng();
var latSpan = northEast.lat() - southWest.lat();
for (var i = 0; i < 10; i++) {
var latlng = new GLatLng(southWest.lat() + latSpan * Math.random(),
southWest.lng() + lngSpan * Math.random());
map.addOverlay(new GMarker(latlng));
}
}
}
</script>
<div id="map_canvas" style="width: 500px; height: 300px"></div>

Customize the above code by :

1. Paste in the Google API key obtained in Step 1 where it says "PASTE_YOUR_GOOGLE_API_KEY_HERE".
2. Put in the latitude and longitude of your map center in this line :
map.setCenter(new GLatLng(37.4419, -122.1419), 13);
3. The above code will add 10 markers at random locations. For more information checkout the Google Maps documentation.
Save Gadget. And you are done. If you get any problem you can ask me via comment on this site.

How to add adsense ads inside, between Blogger blog posts

You may want to add Google Adsense ads inside blog posts. It is a very good thing to do to increase your CTR. CTR means"(the number of times your ad clicked) divided by (number of times it is shown).So,the more CTR you have,the more you get money. Now it's clear?

How to place adsense ads between Blog posts:

By doing this,the adsense units will be displayed between the blog posts in the homepage, archive pages and permalink (individual post pages).
Follow the procedure to do this:

1.Sign in to your blogger dashboard>click on the layout link

click on the layout link
2.Click on the Edit link in the "Blog Posts' column[look at the below screenshot ...

click on Edit 
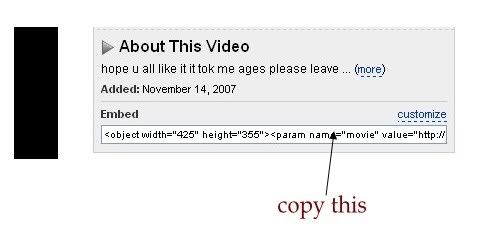
a pop up window opens........ Then ...
3.Check the box next to 'Show ads between Posts'

Next,configure the ads,choose the format,colours,etc and SAVE THE CHANGES now.
 configure the ads 
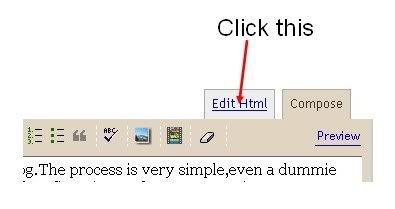
That's it ....! Now your adsense ads will show between blog posts.
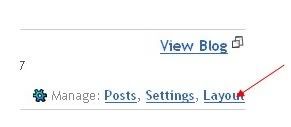
Remember: If you want to know how to add the Adsense ads inside the blog post rather than between the post, follow this:-

 
Now Learn How toShowing adsense ads inside Blogger blog Posts:-
1.  Sign in to your blogger dashboard>layout>Edit html
Check the box next to 'Expand Widget Templates'


2.  Scroll down the window till you see the following code.

<b:if cond='data:post.includeAd'> <data:adEnd/> <data:adCode/> <data:adStart/> </b:if>


3.  Replace that code in the template with the below code

<b:if cond='data:blog.pageType != "item"'> <b:if cond='data:post.includeAd'> <data:adEnd/> <data:adCode/> <data:adStart/> </b:if> </b:if>

4.  Again,scroll down the template and find out data-post body tag (look at the below screenshot) and paste the below code just above that code{this will show ads above the post body}.If you want ads to show below the post,paste the code below that tag.
Here is the code to paste:-

<b:if cond='data:blog.pageType == "item"'> <b:if cond='data:post.includeAd'> <data:adEnd/> <data:adCode/> <data:adStart/> </b:if> </b:if>
That's it. If you have any question and face any problem you can leave a comment for via solution.
Thanks for visiting Ultimate Successful Blogging Tips and Tricks

Saturday, December 3, 2011

How to add PAYPAL DONATE button to your blogger blog

Do you want to make PAYPAL DONATE button? Do you know How to make a paypal donate button and add them in your blog? Adding a Paypal donation button to your blog will give you some chance to get some money from your visitors.
Lets to show you how to do this... To do so you must have a paypal account. If you don't have it you can go to paypal.com and make a free one. And then ....

Step 1:  Log in your paypal account.

Step 2:  When you are in paypal home page then click on Merchant Services at the top of the page
Step 3:  When a new page will open here you will get some options to create buttons in various aspects. As you are willing to make a paypal donate button. Click on DONATE. Look at the picture below.
Step 4:  Fill all the required options and click on create button.
Step 5:  Now you have successfully made your paypal donate button. Paypal will give you html codes for your donate button.
Step 6:  Now Copy it and sign in to your blogger dashboard » Click on the layout » Add a Page element » html/javascript » and paste that html code and save changes.
 
You are done and successfully applied your paypal donete button in your blogger blog. If you have any question ask me on via comment here.

How to Submit a Sitemap for Blogger Blogs?

How to Submit a sitemap for blogger blog? In blogger blog Google have given us chance to increase Search Engine Rank using Goole Webmasters Tools. However Submitting a sitemap for blogger blog is essential for SEO.
Benefits of Google Webmasters Tools:
  • Your Website or Blog can easily get crawl in Google Search Engine.
  • You can know how many pages of your website are indexed by Google Search Engine.
  • You can know what url(s) are occurring error in search engine.
  • You can know about what keywords are visitors trying to search and which keywords have found your site. And so on...
Now, Let me explain the process on how to submit your blogger sitemap to google.

Step 1: First,go to Google webmaster tools and sign in with your gmail account which is used to login blogger.
Step 2: When you entered in site you will be asked to add a site.google webmaster tools
Add your blog url (example:kranthitips.blogspot.com). Note: Don't add with http or www.

Step 3: Next, it will asks you to verify your site. It is just to confirm whether you are the owner or not.

CLICK on the 'verify your site' link.

click the 'verify your site' link

Next,

choose verification method


Step 4: There are two ways to verify your ownership but, there is only one way for the blogger users to add a metatag.

copy the metatag
Step 5: Copy the metatag. Now, sign into your blogger account and click the layout button>Edit html and paste the metatag just after the head tag and save the changes.

paste the metatag like this
Now, go to Google Webmaster Page and click the verify button in the google webmaster tools and there will be a confirmation message saying that you have sucessfully verified.

conformation message
Now, you have to submit a sitemap for google to crawl your site.Go back to the google webmaster dashboard or (home) and click the 'Add' link which is next to your blog name and in the Sitemaps column.Then,you see this,


Choose 'Add general web sitemap' from the dropdown menu and type rss.xml or atom.xml next to your blog address as shown below


or
and click the 'Add General Web Sitemap' button.
Step 6: That's it.Now your sitemap is successfully submitted to google.Check 2 or 3 days after and you will see the detailed statistics of your blog(indexed pages,any errors,etc.). If you have any questions regarding this, you can ask here via your comment. Thanks for reading the article.

Google is Crawling my site very fast - crawling your site slow?

Why Google is not crawling my site? How to get my site crawl Google fast? Ok I have the solution. There are couple of problems for which you are going down for non-crawling Google your web posts. Listen carefully and try to solve those problems.
Problem No.1: Your website or blogs content is not original or it is duplicated from anywhere of the web. You have directly got it and have pasted into your web post.

Solution: Try to write your content with your own idea. If you can't then go to multiple websites with relevant content for your website and copy the contents in notepad you want. Then try to edit the article as you can. Then the article is renewed. And it is an original content finally.

Problem No.2: You have not made a sitemap on Google Webmasters Tools.
Solution: Go to Google Webmasters Tools and signup with your existing Google account and submit a sitemap. Now wait and let Google to crawl your site.

Problem No: 3 Your blog has no relevant links. So that Google consider that your blog is important.
Solution: You can post comment in the top rated and high ranked site and leave a link on the comment of your blog. Be ware that the websites content must to be relevant with your blog.

Primarily you can follow these instructions and I think you will get the result as like me.

I have followed those instructions so that Google is crawling my blog posts less than 1 minute. I have attached my blog posts screenshots.

How To Enable Blogger Blog For Mobile Phones

Enable your Blogger Blog for mobile phone. Because, now a days people are using mobiles for visiting websites and for their entertainments. On the other hand 3G connection has made mobile internet using so swift that day by day the users are preferring using mobile phones for the web. So, to be a successful blogger you must enable your blog for mobile phones.

Your blog can load in mobile without doing anything changes. But it will take more and more time and load the whole large page as the webpage. But with only some step you can your blog easily to load by the users as a wapsite.

Let me show how you can make your blog for mobile phones.

1st step: Sign into your Blogger account > Design > Edit html

Find the following line...


<b:include data='blog' name='all-head-content'/>
2st step: Paste the following code below that line.

<meta content='IE=EmulateIE7' http-equiv='X-UA-Compatible'/>

<b:if cond='data:blog.isMobile'>

<meta content='width=device-width, initial-scale=1.0, user-scalable=0' name='viewport'/>

<b:else/>

<meta content='width=1100' name='viewport'/>

</b:if>

You have done all the works. Now click on Save Template. That's it! Now, your visitors can access your blogger blog through mobile phones with blazing speed. If you get any problem you can leave me a comment.

Friday, December 2, 2011

How to Embed Youtube Videos in Blogger Blog or Website?

Embed youtube videos to your blog or in your website for free. This process is very easy. To embed a youtube video you must have a youtube account. If you have already youtube accounts then ...

Step 1. Go to youtube.com and search for your required video. When results loaded then click on the video.
enter your search item and click the search button

Step 2. Then when your selected video will begin to play go to the bottom of the video. Here you will an option called "Embed Video". Click on it and copy the embeded code(ctrl+c) and paste(ctrl+v) it in windows notepad.

                                 Processing: How to Embed Youtube Videos in Blogger Blog?

copy the copy the html code from the box provided

Step 3. Sign in in to your blogger acoount and click the New Post button and next,select the option 'Edit html' as shown below and paste the html code as shown below.


click the 'edit html' option as shown here

Step 4. Publish the post.That's it, as you can see now, the youtube video is embeded in your site properly.

Remember: You can change the width and height of the video by replacing the values to your desirable ones. If you have any question, leave a comment. Please share this post for your friends to get benefits.

How to Hide, Disable or Remove the Blogger Navbar?

How to hide,disable or remove the blogger navbar(navigation bar) from your blogger blog. The navbar is displayed in every blogger blogs. Removing the navbar of blogger is also a part of SEO. So now-a-days most of the web designer don't use navbar for their templates. Whatever before hide,disable or remove the blogger navbar(navigation bar) we must know about the navbar. Picture of Navbar is in the below.

blogger navbar

Blogger navbar allows users to easily navigate to other random blogs and it also has a feauture to search the blogs ,and mark any blog as spam. So,now you have a clear idea of what really a blogger navbar is.So, why so many people prefer to just remove the navbar inspite of the feautures it has like search,etc.Many people think that, it spoils the look of the blog,especially if your blog has differnet subtitle layout which looks too obvious to see for a visitor.Well, let me come to the actual point on how to disable or hide your blogger navbar.
How to Hide,Disable or Remove the Blogger Navbar?

Lets remove, hide, disable navbar of blogger blog.

Step 1: Sign in to your blogger account and click the layout button next to your blog name

click the layout button

Step 2. Next,click the Edit HTML tab as shown in the below picture.


edit html

Step 3. Add the below html code as specified in the below picture.
#navbar {
height: 0px;
visibility: hidden;
display: none;
}


add the code like this

4. Save the changes.

Now, you can see your blog without that navbar (this tip can only hides the navbar,it doesn't completely delete it).If you want the navbar to appear again,just remove that code and save the changes.
If you have any doubts,regarding this post,don't hesitate to ask.You can ask your doubts via comments to this post. Best of luck.
Solved: How to Hide,Disable or Remove the Blogger Navbar

How to add Blogger Share Buttons to Custom Blogger Templates

How to add Blogger Share Buttons to Custom Blogger Templates Blogger has released their new Share Buttons feature through which makes we can now easier bookmark, tweet, fshare, email ,etc your post of a website. It is associated with the blogger templates (given templates). But, if you're using any custom blogger template, you may not see the widget appearing in blog even though you activate it. In this fact you have to customize your blog a little. Follow the instructions below.
How to add Blogger Share Buttons to Custom Blogger Templates?

Note: before making any changes..first backup your template

Step: 1  Sign into Blogger > Design > Edit HTML  (Here tick the expand widget templates)

2. Add this line anywhere you want the widget to appear


<b:include data='post' name='shareButtons'/>
Normally, in most templates, you can add it after this line..


<p class='post-footer-line post-footer-line-1'>
If you don't find that above line in your template. Find this one.


<p><data:post.body/></p>
and add this code after that line..

<p><data:post.body/></p>
<div style='clear:both; padding: 10px 10px 10px 10px;'> <b:include data='post' name='shareButtons'/> </div>
Note: If you're using Magazine style blogger template, You can find the data:post.body line TWO TIMES.. So, try in both ways and find out which one is working..and remove the other one.

Be aware: If you still don't see it in your Blog, Make sure..you activated it by going to
Blogger Dashboard > Design > Click the 'edit' button of the Blog post section.


I hope you are now succeed. If  you face any kind of problem you can ask me on comment.
SOLVED: How to add Blogger Share Buttons to Custom Blogger Templates

How to navigate your blog page to number


Many of the blogger face a problem of their blogs page navigation. Their blogs shows old and new post instead of page numbers. This cause less page views of a blog. Because if a blog have many page then the visitor can't to go to the last post and the post remain ignored.
As I already stated Page navigation allows us to number blog pages(1, 2, 3 ....) like those of a book. This replaces the 'newer' and 'older' post links and give users/visitors an ability to go to the deep into your blog. So let's add this elegant hack to your blog. Follow me ...

Go to Blogger Dashboard > Layout > Edit HTML. Always Download Full Template for Backup. Do NOT click on Expand Widget Templates. Now look for

]]></b:skin>
Now add following code ABOVE it.

.showpageNum a {
padding: 3px 8px;
margin:0 4px;
text-decoration: none;
border:1px solid #999;
-webkit-border-radius:3px;-moz-border-radius:3px;
background: #ddd;
}
.showpageOf {
margin:0 8px 0 0;
}
.showpageNum a:hover {
border:1px solid #888;
background: #ccc;
}
.showpagePoint {
color:#fff;
text-shadow:0 1px 2px #333;
padding: 3px 8px;
margin: 2px;
font-weight: 700;
-webkit-border-radius:3px;-moz-border-radius:3px;
border:1px solid #999;
background: #666;
text-decoration: none;
}

STEP 2 - Adding JavaSript

Look for

</body>

And add following code ABOVE it.


&lt;script type='text/javascript'&gt;
var home_page=&quot;/&quot;;
var urlactivepage=location.href;
var postperpage=7;
var numshowpage=4;
var upPageWord ='Prev';
var downPageWord ='Next';
&lt;/script&gt;
&lt;script src='http://scriptabufarhan.googlecode.com/svn/trunk/pagenaviv202-min.js' type='text/javascript'&gt;&lt;/script&gt;

Here you can change Prev and Next Text.

var postperpage=7;
var numshowpage=4;

Postperpage : How many Posts you want to show on one Page of blog.
Numshowpage : how Many number will show in Your page Navigation

e.g. If you want to show 5 posts per page then change var postperpage=7; to var postperpage=5;

Save your Template.

STEP 3 - Label Fix (Customization)

Again go to Blogger Dashboard > Layout > Edit HTML. This time Click on Expand Widget templates.

Look for

'data:label.url'

And replace it with

'data:label.url + &quot;?&amp;max-results=7&quot;'

Again here you have to change 7 to 5 if you want to show 5 posts per page.
Save your template and view your blog.

Enjoy! If you have got any question or any problem you can ask me posting via comment.